「Review Boardの導入手順」の版間の差分
(→Apache) |
|||
| (同じ利用者による、間の2版が非表示) | |||
| 1行目: | 1行目: | ||
[[Category:ソフトウェア開発]] | [[Category:ソフトウェア開発]][[Category:導入手順]] | ||
本ページでは、ソースコードレビューツールであるReview Boardの導入手順を記述します。 | 本ページでは、ソースコードレビューツールであるReview Boardの導入手順を記述します。 | ||
| 426行目: | 426行目: | ||
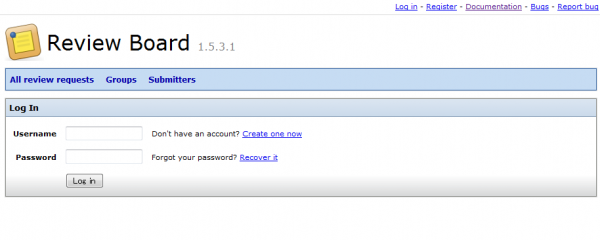
ブラウザによる初回アクセス時、ログインユーザ名・パスワードを聞かれますので、管理者用のアカウントでログインします。 | ブラウザによる初回アクセス時、ログインユーザ名・パスワードを聞かれますので、管理者用のアカウントでログインします。 | ||
[[ファイル:Install | [[ファイル:Install reviewboard01.png|600px]] | ||
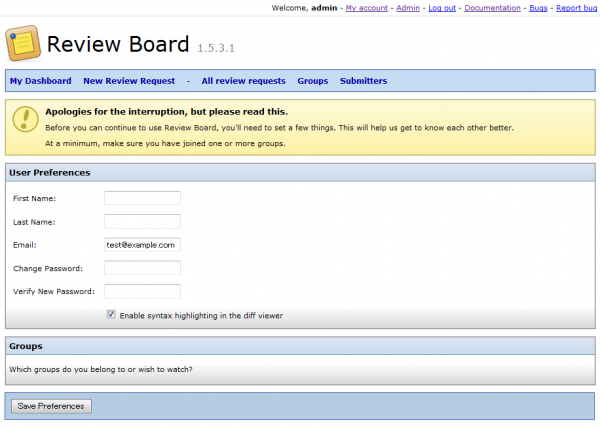
ユーザ情報を記入するページに遷移します。姓名を記入しても良いですし、空欄のままでもOKです。 | ユーザ情報を記入するページに遷移します。姓名を記入しても良いですし、空欄のままでもOKです。 | ||
[[ファイル:Install | [[ファイル:Install reviewboard02.png|600px]] | ||
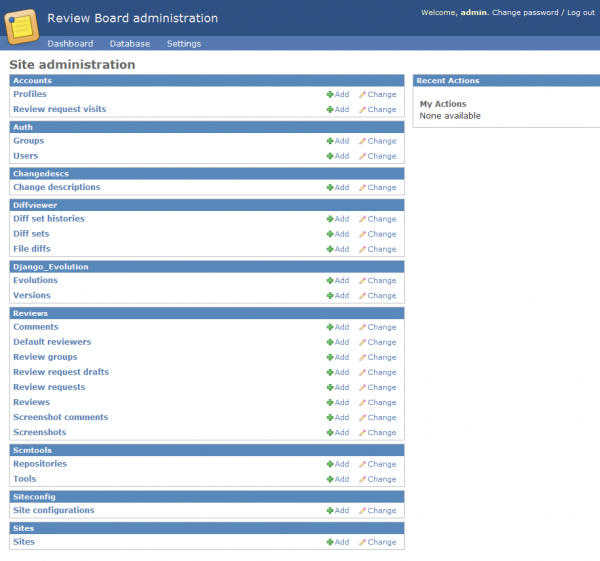
ダッシュボードが表示されます。 | ダッシュボードが表示されます。 | ||
[[ファイル:Install | [[ファイル:Install reviewboard03.png|600px]] | ||
== Review Boardの設定 == | == Review Boardの設定 == | ||
| 442行目: | 442行目: | ||
[Admin]->[Database]->[Repositories]の右にある[Add]を選択します。 | [Admin]->[Database]->[Repositories]の右にある[Add]を選択します。 | ||
[[ファイル:Install | [[ファイル:Install reviewboard04.png|600px]] | ||
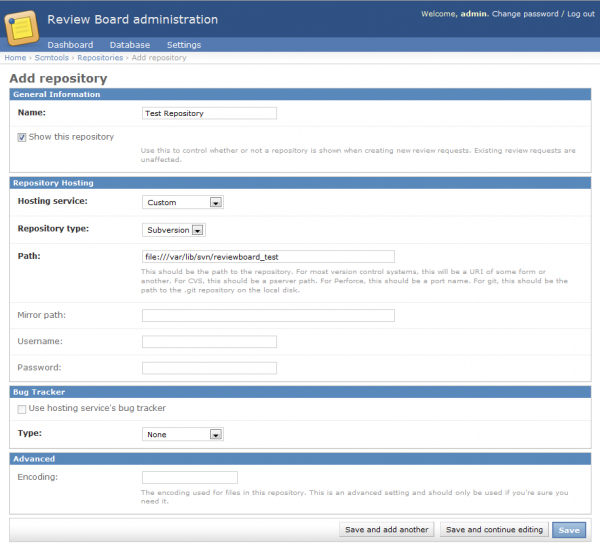
以下のように入力します。Subversionリポジトリを「file:///var/lib/svn/reviewboard_test」としています。 | |||
[[ファイル:Install | [[ファイル:Install reviewboard05.png|600px]] | ||
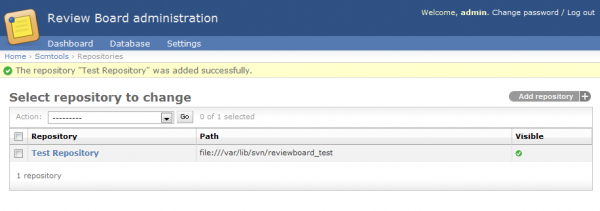
「The repository "Test Repository" was added successfully.」と表示されればOKです。 | 「The repository "Test Repository" was added successfully.」と表示されればOKです。 | ||
[[ファイル:Install | [[ファイル:Install reviewboard06.png|600px]] | ||
Subversion作業リポジトリの変更点をレビュー要請するためのコマンドである「post-review」の使用方法については、[http://www.reviewboard.org/docs/manual/dev/users/tools/post-review/ こちら(英語)]を参考にしてください。 | Subversion作業リポジトリの変更点をレビュー要請するためのコマンドである「post-review」の使用方法については、[http://www.reviewboard.org/docs/manual/dev/users/tools/post-review/ こちら(英語)]を参考にしてください。 | ||
2011年2月19日 (土) 15:48時点における最新版
本ページでは、ソースコードレビューツールであるReview Boardの導入手順を記述します。
要件
- バージョン管理はSubversionを使用
- Review BoardのDBはMySQLを使用
環境
- OS : CentOS 5.5
- Review Board : 1.5.3
- Apache : 2.2.17
- Python : 2.7.1
- setuptools : 0.6c11
- pysvn : 1.7.2
- modwsgi : 3.3
- MySQL : 5.1.54
- Subversion : 1.6.15
インストール
MySQL
入手先 : http://www.mysql.com/
$ tar zxvf mysql-5.1.54.tar.gz
$ cd mysql-5.1.54
$ ./configure
$ make
# make install
MySQLインストール後、共有ライブラリとして認識させるために「/etc/ld.so.conf」に以下の行を追記します。
/usr/local/lib/mysql共有ライブラリリストを更新するために以下を実行します。
# /sbin/ldconfigApache
入手先 : http://httpd.apache.org/
$ tar zxvf httpd-2.2.17.tar.gz
$ cd neon-0.29.5
$ ./configure --enable-dav
$ make
# make install
「--enable-dav」はSubversionインストール時に導入されるモジュール「dav_svn_module」を動作させるために必要です。
Python
入手先 : http://www.python.org/
$ tar jxvf Python-2.7.1.tar.bz2
$ cd Python-2.7.1
$ ./configure --enable-shared
$ make
# make install
setuptools
Pythonパッケージをダウンロード、ビルド、インストールおよび管理をするツールであるEasy Installを使用するため、setuptoolsを導入します。
入手先 : http://pypi.python.org/pypi/setuptools/0.6c11
Pythonインストール後、「libpython2.7.so.1.0」を共有ライブラリとして認識させるために「/etc/ld.so.conf」に以下の行を追記します。
/usr/local/lib共有ライブラリリストを更新するために以下を実行します。
# /sbin/ldconfigsetuptoolsをインストールします。
# sh setuptools-0.6c11-py2.7.eggneon
後述するSubversionに必要なライブラリであるneonをインストールします。
入手先 : http://www.webdav.org/neon/
$ tar zxvf neon-0.29.5.tar.gz
$ cd httpd-2.2.17
$ ./configure
$ make
# make install
SQLite Amalgamation
後述するSubversionに必要となるSQLiteのソースコードをダウンロードします。SQLite Amalgamationのダウンロード後の手順はSubversionの項で記述します。
入手先 : http://www.sqlite.org/sqlite-amalgamation-3.6.13.tar.gz
Subversion
入手先 : http://subversion.tigris.org/
$ tar jxvf subversion-1.6.15.tar.bz2
$ tar zxvf sqlite-amalgamation-3.6.13.tar.gz
$ mv sqlite-3.6.13/ subversion-1.6.15/sqlite-amalgamation
$ cd subversion-1.6.15
$ ./configure
$ make
# make install
pysvn
Review BoardでSubversionを利用するためのPythonモジュールであるpysvnをインストールします。
入手先 : http://pysvn.tigris.org/
$ tar zxvf pysvn-1.7.2.tar.gz
$ cd pysvn-1.7.2/Source
$ python setup.py backport
$ python setup.py configure --apr-inc-dir=/usr/local/apache2/include/ --apr-lib-dir=/usr/local/apache2/lib/
$ make
# mkdir /usr/local/lib/python2.7/site-packages/pysvn
# cp pysvn/__init__.py /usr/local/lib/python2.7/site-packages/pysvn
# cp pysvn/_pysvn_2_7.so /usr/local/lib/python2.7/site-packages/pysvn
modwsgi
ApacheとPythonを連携させるためのモジュールであるmodwsgiをインストールします。
入手先 : http://code.google.com/p/modwsgi/
$ tar zxvf mod_wsgi-3.3.tar.gz
$ cd mod_wsgi-3.3
$ ./configure --with-apxs=/usr/local/apache2/bin/apxs
$ make
# make install
Review Board
Easy Installを使用して、Review Boardをインストールします。同時に、Review Boardのコマンドラインツールである「RBTools」もインストールします。
# easy_install ReviewBoard
# easy_install RBTools
その他
PythonでMySQLを利用するためのライブラリをインストールします。
# easy_install mysql-python設定
MySQL
ユーザ「mysql」を作成し、DBを初期化します。
# /usr/sbin/useradd mysql
# /usr/local/bin/mysql_install_db --user=mysql
DBを起動し、rootのパスワードを設定します。
# /usr/local/bin/mysqld_safe --user=mysql &
# /usr/local/bin/mysqladmin -u root password <password>
Sonarでアクセスするためのユーザ(reviewboard)とパスワード(reviewboard)を作成し、DB(reviewboard)を作成します。
# mysql -u root -pmysql> grant all privileges on *.* to reviewboard@localhost identified by 'reviewboard' with grant option;
mysql> create database reviewboard default character set utf8;
Review Board
レビュー用のサイトを構築します。
# rb-site install /var/lib/reviewboard対話形式の設定を行います。補足説明を「#」を先頭文字として記述しています。
* Welcome to the Review Board site installation wizard

    This will prepare a Review Board site installation in:

    /var/lib/reviewboard

    We need to know a few things before we can prepare your site for
    installation. This will only take a few minutes.


* Make sure you have the modules you need

    Depending on your installation, you may need certain Python
    modules and servers that are missing.

    If you need support for any of the following, you will need to
    install the necessary modules and restart the install.

    Databases (optional):
        * PostgreSQL (psycopg2)


* What's the host name for this site?

    This should be the fully-qualified host name without the http://,
    port or path.

Domain Name: hostname # ホスト名を入力


* What URL path points to Review Board?

    Typically, Review Board exists at the root of a URL. For example,
    http://reviews.example.com/. In this case, you would specify "/".

    However, if you want to listen to, say,
    http://example.com/reviews/, you can specify "/reviews/".

    Note that this is the path relative to the domain and should not
    include the domain name.

    The default is /

Root Path [/]:


* What URL will point to the media files?

    While most installations distribute media files on the same server
    as the rest of Review Board, some custom installs may instead have
    a separate server for this purpose.

    The default is media/

Media URL [media/]:


* What database type will you be using?

    You can type either the name or the number from the list below.

    (1) mysql
    (2) sqlite3

Database Type: 1 # mysqlを選択


* What database name should Review Board use?

    You may need to create this database and grant a user modification
    rights before continuing.

    The default is reviewboard

Database Name [reviewboard]:


* What is the database server's address?

    This should be specified in hostname:port form. The port is
    optional if you're using a standard port for the database type.

    The default is localhost

Database Server [localhost]:


* What is the login and password for this database?

    This must be a user that has creation and modification rights on
    the database.

Database Username: reviewboard

Database Password:


* What cache mechanism should be used?

    memcached is strongly recommended. Use it unless you have a good
    reason not to.

    You can type either the name or the number from the list below.

    (1) memcached
    (2) file

Cache Type: 2 # memchachedは未インストールなので、fileを選択


* Where should the temporary cache files be stored?

    The default is /tmp/reviewboard_cache

Cache Directory [/tmp/reviewboard_cache]:


* What web server will you be using?

    You can type either the name or the number from the list below.

    (1) apache
    (2) lighttpd

Web Server: 1 # apache指定


* What Python loader module will you be using?

    Based on our experiences, we recommend using modpython with Review
    Board.

    You can type either the name or the number from the list below.

    (1) modpython
    (2) fastcgi
    (3) wsgi

Python Loader: 3 # wsgiを指定


* Create an administrator account

    To configure Review Board, you'll need an administrator account.
    It is advised to have one administrator and then use that account
    to grant administrator permissions to your personal user account.

    If you plan to use NIS or LDAP, use an account name other than
    your NIS/LDAP account so as to prevent conflicts.

    The default is admin

Username [admin]: # Review Boardの管理者用ユーザを指定

Password: # パスワードを入力

E-Mail Address: test@example.com # メールアドレスを入力


* Installing the site...

(以下省略)
Apache
「/usr/local/apache2/conf/httpd.conf」を編集します。
DocumentRootを以下に変更します。
# DocumentRoot "/usr/local/apache2/htdocs"
DocumentRoot "/var/lib/reviewboard/htdocs"
以下を追記します。
LoadModule wsgi_module modules/mod_wsgi.so

ErrorDocument 500 /errordocs/500.html

WSGIPassAuthorization On
WSGIScriptAlias "/" "/var/lib/reviewboard/htdocs/reviewboard.wsgi"

<Directory "/var/lib/reviewboard/htdocs">
	Options Indexes FollowSymLinks
	AllowOverride None
	Order allow,deny
	Allow from all
</Directory>

Alias /media "/var/lib/reviewboard/htdocs/media"
Alias /errordocs "/var/lib/reviewboard/htdocs/errordocs"
起動
MySQL
# /usr/local/bin/mysqld_safe --user=mysql &
Apache
# /usr/local/apache2/bin/apachectl start
ブラウザによる初回アクセス時、ログインユーザ名・パスワードを聞かれますので、管理者用のアカウントでログインします。
ユーザ情報を記入するページに遷移します。姓名を記入しても良いですし、空欄のままでもOKです。
ダッシュボードが表示されます。
Review Boardの設定
Subversionリポジトリを参照する
[Admin]->[Database]->[Repositories]の右にある[Add]を選択します。
以下のように入力します。Subversionリポジトリを「file:///var/lib/svn/reviewboard_test」としています。
「The repository "Test Repository" was added successfully.」と表示されればOKです。
Subversion作業リポジトリの変更点をレビュー要請するためのコマンドである「post-review」の使用方法については、こちら(英語)を参考にしてください。
トラブルシューティング
Apache起動時にエラーが発生する
以下のエラーが発生した場合は、Apacheのconfigureオプションを「--enable-dav」としているかを確認してください。
httpd: Syntax error on line 54 of /usr/local/apache2/conf/httpd.conf: Cannot load /usr/local/apache2/modules/mod_dav_svn.so into server: /usr/local/apache2/modules/mod_dav_svn.so: undefined symbol: dav_register_providermod_wsgiでコンパイルエラーが発生する
make時に以下のエラーが発生した場合は、pythonのshared libraryが存在しないかもしれません。pythonのconfigureオプションを「--enable-shared」としているかを確認してください。
$ make
/usr/local/apache2/bin/apxs -c -I/usr/local/include/python2.7 -DNDEBUG   mod_wsgi.c -L/usr/local/lib -L/usr/local/lib/python2.7/config  -lpython2.7 -lpthread -ldl  -lutil -lm
/usr/local/apache2/build/libtool --silent --mode=compile gcc -prefer-pic   -DLINUX=2 -D_REENTRANT -D_GNU_SOURCE -g -O2 -pthread -I/usr/local/apache2/include  -I/usr/local/apache2/include   -I/usr/local/apache2/include  -I/usr/local/include/python2.7 -DNDEBUG  -c -o mod_wsgi.lo mod_wsgi.c && touch mod_wsgi.slo
/usr/local/apache2/build/libtool --silent --mode=link gcc -o mod_wsgi.la  -rpath /usr/local/apache2/modules -module -avoid-version    mod_wsgi.lo -L/usr/local/lib -L/usr/local/lib/python2.7/config -lpython2.7 -lpthread -ldl -lutil -lm
/usr/bin/ld: /usr/local/lib/libpython2.7.a(node.o): relocation R_X86_64_32 against `a local symbol' can not be used when making a shared object; recompile with -fPIC
/usr/local/lib/libpython2.7.a: could not read symbols: Bad value
collect2: ld returned 1 exit status
apxs:Error: Command failed with rc=65536
.
make: *** [mod_wsgi.la] エラー 1
参考 : http://code.google.com/p/modwsgi/wiki/InstallationIssues
rb-site install実行時、使用DBにMySQLを選択できない
「rb-site install」install時、以下のメッセージが表示され、mysql-pythonモジュールをインストールしているにもかかわらず、MySQLが選択できない場合があります。
* Make sure you have the modules you need

    Depending on your installation, you may need certain Python
    modules and servers that are missing.

    If you need support for any of the following, you will need to
    install the necessary modules and restart the install.

    Databases (optional):
        * MySQL (MySQLdb)
        * PostgreSQL (psycopg2)
pythonコマンドでMySQLdbモジュールをコールすると、エラーが表示されます。
# python
Python 2.7.1 (r271:86832, Feb 19 2011, 21:31:55)
[GCC 4.1.2 20080704 (Red Hat 4.1.2-48)] on linux2
Type "help", "copyright", "credits" or "license" for more information.
>>> __import__("MySQLdb")
Traceback (most recent call last):
  File "<stdin>", line 1, in <module>
  File "build/bdist.linux-x86_64/egg/MySQLdb/__init__.py", line 19, in <module>

  File "build/bdist.linux-x86_64/egg/_mysql.py", line 7, in <module>
  File "build/bdist.linux-x86_64/egg/_mysql.py", line 6, in __bootstrap__
ImportError: libmysqlclient_r.so.16: cannot open shared object file: No such file or directory
>>>
解決方法は、「libmysqlclient_r.so.16」を共有ライブラリとして読み込ませることです。手順は、MySQLインストールの項を参照してください。
更新履歴
- ページ作成 -- 2011年2月20日 (日) 00:41 (JST)
