「Redmineの導入手順」の版間の差分
| (同じ利用者による、間の12版が非表示) | |||
| 264行目: | 264行目: | ||
[http://blog.redmine.jp/articles/farend-basic-theme/ farend basic]というテーマを使用しています。 | [http://blog.redmine.jp/articles/farend-basic-theme/ farend basic]というテーマを使用しています。 | ||
== トラブルシューティング == | |||
=== 「rake db:migrate RAILS_ENV=production」コマンド実行時にエラーが発生する。 === | |||
以下のエラーメッセージが表示された場合、「rake generate_session_store」コマンドの実行が漏れている可能性があります。 | |||
<source lang="text"> | |||
(in /var/lib/redmine) | |||
rake aborted! | |||
A key is required to write a cookie containing the session data. Use config.action_controller.session = { :key => "_myapp_session", :secret => "some secret phrase" } in config/environment.rb | |||
(See full trace by running task with --trace) | |||
</source> | |||
== RedmineでMercurialリポジトリを参照する == | |||
=== 作成手順 === | |||
Mercurialのリポジトリを作成し、hgrcファイルを編集します。 | |||
mkdir /var/lib/hg/test00 | |||
cd /var/lib/hg/test00 | |||
vim .hg/hgrc | |||
hgrcファイルの内容は以下とします。 | |||
[web] | |||
allow_push = * | |||
push_ssl = false | |||
Webサーバを立ち上げます。 | |||
hg serve --port 8002 | |||
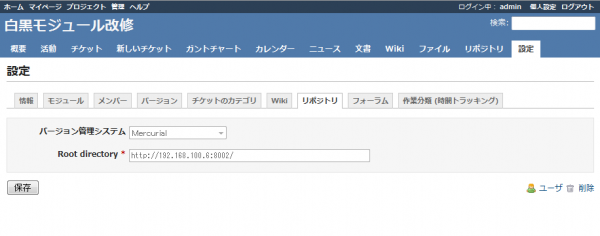
[設定]->[リポジトリ]のページで以下のように設定します。 | |||
[[ファイル:Install redmine 01.png|600px]] | |||
[リポジトリ]のページを参照すると、Mercurialのリポジトリを参照できます。 | |||
[[ファイル:Install redmine 02.png|600px]] | |||
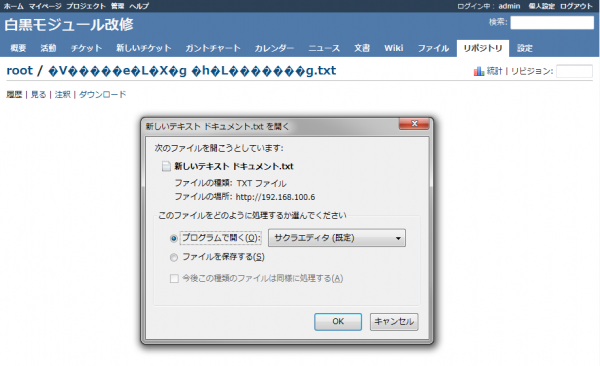
上記画像で文字化けしているテキストファイルは、「新しいテキスト ドキュメント.txt」という名前のファイルです。これは、ページの文字コードが「UTF-8」に対して、ファイルの文字コードが「Shift_JIS」であるために発生します。 | |||
=== 日本語ファイル名を含むファイルの履歴が表示されない === | |||
英字だけのファイル名の場合、履歴が正常に表示されます。 | |||
[[ファイル:Install redmine 03.png|600px]] | |||
日本語を含むファイル名の場合、履歴が表示されません。ただし、ダウンロードはできます。 | |||
[[ファイル:Install redmine 04.png|600px]] | |||
=== Root directoryをhttpプロトコルで指定すると参照できない === | |||
Root directoryを「http://192.168.100.6:8002/」等のhttpで指定すると、リポジトリ参照ができません。(一応、Webアクセス時、GETメソッドを使用しているようですが) | |||
[[ファイル:Install redmine 05.png|600px]] | |||
[[ファイル:Install redmine 06.png|600px]] | |||
そもそも、想定外の指定方法かも知れません。(要調査) | |||
== その他 == | == その他 == | ||
=== RMagickをインストールする === | |||
プラグイン[https://ociotec.com/redmine/projects/show/advanced-roadmap Adcanced roadmap]をインストールするためには[http://rmagick.rubyforge.org/ RMagick]が必要となります。 | |||
RMagickをインストールするまでの手順は以下となります。 | |||
==== FreeType ==== | |||
ImageMagickにてTrueTypeフォントを使用するため、FreeTypeをインストールします。 | |||
# yum install freetype freetype-devel | |||
==== libpngのインストール ==== | |||
入手先 : http://www.libpng.org/pub/png/libpng.html | |||
PNG形式のグラフを出力するときに使用するライブラリです。 | |||
$ tar zxvf libpng-1.5.4.tar.gz | |||
$ cd libpng-1.5.4 | |||
$ ./configure | |||
$ make | |||
$ su | |||
# make install | |||
==== ImageMagickのインストール ==== | |||
入手先 : http://www.imagemagick.org/script/index.php | |||
$ tar zxvf ImageMagick.tar.gz | |||
$ cd ImageMagick-6.7.1-3 | |||
$ ./configure | |||
$ make | |||
$ su | |||
# make install | |||
==== RMagickのインストール ==== | |||
$ gem install rmagick | |||
==== Advenced roadmapのソースコード修正 ==== | |||
標準では、Advanced roadmapのグラフの凡例が文字化けするので、「vendor/plugins/advanced_roadmap/lib/advanced_roadmap/gruff/base.rb」を修正します。 | |||
修正例 : | |||
<source lang="diff"> | |||
226,227c226,228 | |||
< vera_font_path = File.expand_path('Vera.ttf', ENV['MAGICK_FONT_PATH']) | |||
< @font = File.exists?(vera_font_path) ? vera_font_path : nil | |||
--- | |||
> # vera_font_path = File.expand_path('Vera.ttf', ENV['MAGICK_FONT_PATH']) | |||
> # @font = File.exists?(vera_font_path) ? vera_font_path : nil | |||
> @font = "/usr/share/fonts/japanese/TrueType/sazanami-gothic.ttf" | |||
</source> | |||
参考 : | |||
* http://groups.google.com/group/redmine-users-ja/browse_thread/thread/13410c0c0c809dc6 | |||
インストールは以上です。 | |||
-- 2011年8月8日 (月) 21:41 (JST) | |||
=== サブディレクトリにRedmineを配置するには === | === サブディレクトリにRedmineを配置するには === | ||
| 271行目: | 398行目: | ||
通常インストールでは、Redmineのルートは「http://<ホスト名>/」となります。これを、「http://<ホスト名>/test/」とするには以下とします。 | 通常インストールでは、Redmineのルートは「http://<ホスト名>/」となります。これを、「http://<ホスト名>/test/」とするには以下とします。 | ||
「httpd. | 「httpd.conf」に以下を追記します。(DocumentRootは「"/usr/local/apache2/htdocs"」のままとします) | ||
RailsBaseURI /test | RailsBaseURI /test | ||
| 278行目: | 405行目: | ||
以上の手順により、1サーバで複数のRedmineを構築することも可能です。 | 以上の手順により、1サーバで複数のRedmineを構築することも可能です。 | ||
=== developmentモードで起動するには === | |||
「httpd.conf」に以下を追記します。 | |||
RailsEnv development | |||
=== プラグインをインストールした後のDB初期化コマンド === | |||
rake db:migrate_plugins RAILS_ENV=production | |||
== 参考 == | == 参考 == | ||
| 285行目: | 421行目: | ||
== 更新履歴 == | == 更新履歴 == | ||
* [[#RMagickをインストールする]] -- 2011年8月8日 (月) 21:41 (JST) | |||
* [[#RedmineでMercurialリポジトリを参照する]]追加 -- 2011年3月20日 (日) 18:46 (JST) | |||
* ページ作成 -- 2011年1月23日 (日) 16:35 (JST) | * ページ作成 -- 2011年1月23日 (日) 16:35 (JST) | ||
2012年11月12日 (月) 06:32時点における最新版
本ページでは、Rubyで作成されたバグトラッキングシステムである「Redmine」の導入手順を記述します。バージョン管理システムである「Mercurial」も同時にインストールします。
環境
- OS : CentOS 5.4
- Web Server : Apache 2.2.17
- Database : MySQL 5.1.54
- Other : Redmine 1.1.0, Ruby 1.8.7, rubygems 1.4.2, Mercurial 1.7.3
インストール
MySQL
$ tar zxvf mysql-5.1.54.tar.gz
$ cd mysql-5.1.54
$ ./configure
$ make
# make install
Apache
入手先 : http://httpd.apache.org/
$ tar zxvf httpd-2.2.17.tar.gz
$ cd httpd-2.2.17
$ ./configure
$ make
# make install
Ruby
入手先 : http://www.ruby-lang.org/
$ tar zxvf ruby-1.8.7-p330.tar.gz
$ cd ruby-1.8.7-p330
$ ./configure
$ make
# make install
RubyGems
入手先 : http://rubyforge.org/projects/rubygems/
$ tar zxvf rubygems-1.4.2.tgz
$ cd rubygems-1.4.2
# ruby setup.rb
Ruby on Rails
RubyGemsからインストールします。公式サイトにある通り、バージョン2.3.5のRailsをインストールします。
# gem install rails -v 2.3.5Docutils
Mercurialをインストールするための準備として、Docutilsをインストールします。
入手先 : http://docutils.sourceforge.net/
$ tar zxvf docutils-0.7
$ cd docutils-0.7
# ./setup.py install
Pythonはインストール済みとします。
Mercurial
入手先 : http://mercurial.selenic.com/
$ tar zxvf mercurial-1.7.3.tar.gz
$ cd mercurial-1.7.3
$ make all
# make install
Redmine
入手先 : http://www.redmine.org/
$ tar zxvf redmine-1.1.0.tar.gz
# gem install -v=0.4.2 i18n
# mv redmine-1.1.0 /var/lib/redmine
# cd /var/lib/redmine/
# rake generate_session_store
i18nはrakeに必要なためインストールします。
Passenger
Passengerをインストールします。
# gem install passengerApache用モジュールをインストールします。
# export APXS2=/usr/local/apache2/bin/apxs
# export PATH=/usr/local/apache2/bin:$PATH
# passenger-install-apache2-module
「Please edit your Apache configuration file, and add these lines:」の次の3行を控えて置きます。後に「httpd.conf」の設定で必要になります。
The Apache 2 module was successfully installed.

Please edit your Apache configuration file, and add these lines:

   LoadModule passenger_module /usr/local/lib/ruby/gems/1.8/gems/passenger-3.0.2/ext/apache2/mod_passenger.so
   PassengerRoot /usr/local/lib/ruby/gems/1.8/gems/passenger-3.0.2
   PassengerRuby /usr/local/bin/ruby

After you restart Apache, you are ready to deploy any number of Ruby on Rails
applications on Apache, without any further Ruby on Rails-specific
configuration!

Press ENTER to continue.
MySQL用のデータベースアクセスライブラリ
MySQL用のデータベースアクセスライブラリをインストールします。
# gem install mysql -- --with-mysql-lib=/usr/local/lib/mysql/インストール中に「No definition for ...」から始まる行がいくつか出力されます。
「ld.so.conf」に「/usr/local/lib/mysql/」を追加します。
# vim /etc/ld.so.conf共有ライブラリを再認識させます。
# /sbin/ldconfig設定
MySQL
ユーザ「mysql」を作成し、DBを初期化します。
# /usr/sbin/useradd mysql
# /usr/local/bin/mysql_install_db --user=mysql
DBを起動し、rootのパスワードを設定します。
# /usr/local/bin/mysqld_safe --user=mysql &
# /usr/local/bin/mysqladmin -u root password <password>
Redmineでアクセスするためのユーザ(redmine)を作成し、DBを作成します。
# mysql -u root -pmysql> grant all privileges on *.* to redmine@localhost identified by '<パスワード>' with grant option;
mysql> create database redmine default character set utf8;RedmineのDB接続設定を行います。
$ cd /var/lib/redmine/config/
$ cp database.yml.example database.yml
$ vim database.yml
productionのセクションの「username:」に先ほど作成したユーザ名、「password:」にDBパスワードを追記します。
production:
  adapter: mysql
  database: redmine
  host: localhost
  username: redmine
  password: <パスワード>
  encoding: utf8
DBを初期化します。
# rake db:migrate RAILS_ENV=production本コマンドで、以下のメッセージが表示される場合は、共有ライブラリの設定が不十分かもしれません。
(in /var/lib/redmine)
rake aborted!
Object is not missing constant Issue!

(See full trace by running task with --trace)
標準のワークフローを導入します。
# rake redmine:load_default_data RAILS_ENV=production「Select language:」と表示されたら「ja」を入力します。
Apache
「/usr/local/apache2/conf/httpd.conf」を編集します。
DocumentRootを以下に変更します。
# DocumentRoot "/usr/local/apache2/htdocs"
DocumentRoot "/var/lib/redmine/public"
以下を追記します。
<Directory "/var/lib/redmine/public">
    Options Indexes FollowSymLinks
    AllowOverride None
    Order allow,deny
    Allow from all
</Directory>

LoadModule passenger_module /usr/local/lib/ruby/gems/1.8/gems/passenger-3.0.2/ext/apache2/mod_passenger.so
PassengerRoot /usr/local/lib/ruby/gems/1.8/gems/passenger-3.0.2
PassengerRuby /usr/local/bin/ruby
下の3行は、「passenger-install-apache2-module」の出力結果を必ず貼り付けてください。
起動
MySQL
# /usr/local/bin/mysqld_safe --user=mysql &
Apache
# /usr/local/apache2/bin/apachectl start
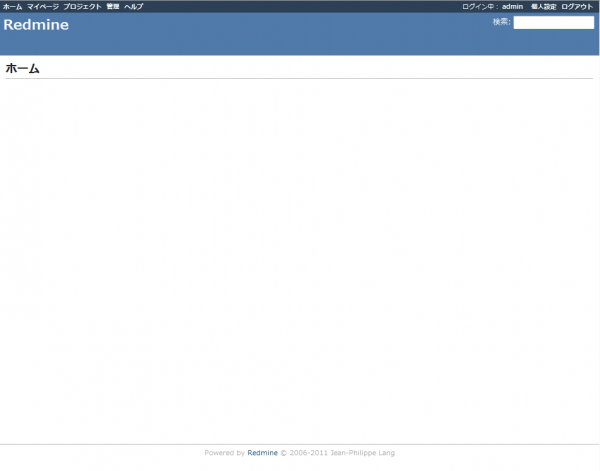
Apache起動後、Redmine初期画面は以下のようになります。
farend basicというテーマを使用しています。
トラブルシューティング
「rake db:migrate RAILS_ENV=production」コマンド実行時にエラーが発生する。
以下のエラーメッセージが表示された場合、「rake generate_session_store」コマンドの実行が漏れている可能性があります。
(in /var/lib/redmine)
rake aborted!
A key is required to write a cookie containing the session data. Use config.action_controller.session = { :key => "_myapp_session", :secret => "some secret phrase" } in config/environment.rb

(See full trace by running task with --trace)
RedmineでMercurialリポジトリを参照する
作成手順
Mercurialのリポジトリを作成し、hgrcファイルを編集します。
mkdir /var/lib/hg/test00
cd /var/lib/hg/test00
vim .hg/hgrc
hgrcファイルの内容は以下とします。
[web]
allow_push = *
push_ssl = false
Webサーバを立ち上げます。
hg serve --port 8002
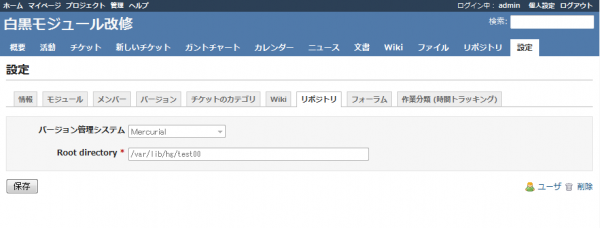
[設定]->[リポジトリ]のページで以下のように設定します。
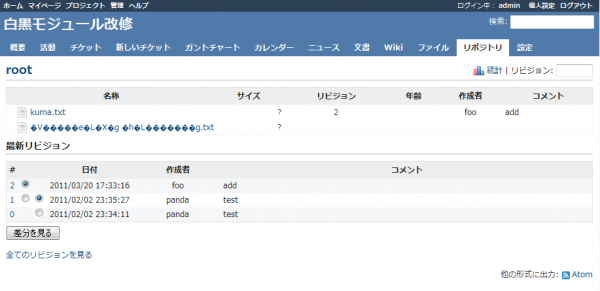
[リポジトリ]のページを参照すると、Mercurialのリポジトリを参照できます。
上記画像で文字化けしているテキストファイルは、「新しいテキスト ドキュメント.txt」という名前のファイルです。これは、ページの文字コードが「UTF-8」に対して、ファイルの文字コードが「Shift_JIS」であるために発生します。
日本語ファイル名を含むファイルの履歴が表示されない
英字だけのファイル名の場合、履歴が正常に表示されます。
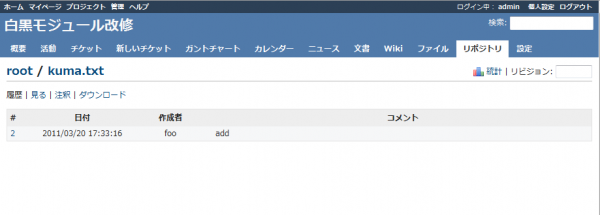
日本語を含むファイル名の場合、履歴が表示されません。ただし、ダウンロードはできます。
Root directoryをhttpプロトコルで指定すると参照できない
Root directoryを「http://192.168.100.6:8002/」等のhttpで指定すると、リポジトリ参照ができません。(一応、Webアクセス時、GETメソッドを使用しているようですが)
そもそも、想定外の指定方法かも知れません。(要調査)
その他
RMagickをインストールする
プラグインAdcanced roadmapをインストールするためにはRMagickが必要となります。
RMagickをインストールするまでの手順は以下となります。
FreeType
ImageMagickにてTrueTypeフォントを使用するため、FreeTypeをインストールします。
# yum install freetype freetype-devel
libpngのインストール
入手先 : http://www.libpng.org/pub/png/libpng.html
PNG形式のグラフを出力するときに使用するライブラリです。
$ tar zxvf libpng-1.5.4.tar.gz
$ cd libpng-1.5.4
$ ./configure
$ make
$ su
# make install
ImageMagickのインストール
入手先 : http://www.imagemagick.org/script/index.php
$ tar zxvf ImageMagick.tar.gz
$ cd ImageMagick-6.7.1-3
$ ./configure
$ make
$ su
# make install
RMagickのインストール
$ gem install rmagick
Advenced roadmapのソースコード修正
標準では、Advanced roadmapのグラフの凡例が文字化けするので、「vendor/plugins/advanced_roadmap/lib/advanced_roadmap/gruff/base.rb」を修正します。
修正例 :
226,227c226,228
<         vera_font_path = File.expand_path('Vera.ttf', ENV['MAGICK_FONT_PATH'])
<         @font = File.exists?(vera_font_path) ? vera_font_path : nil
---
> #        vera_font_path = File.expand_path('Vera.ttf', ENV['MAGICK_FONT_PATH'])
> #        @font = File.exists?(vera_font_path) ? vera_font_path : nil
>         @font = "/usr/share/fonts/japanese/TrueType/sazanami-gothic.ttf"
参考 :
インストールは以上です。
-- 2011年8月8日 (月) 21:41 (JST)
サブディレクトリにRedmineを配置するには
通常インストールでは、Redmineのルートは「http://<ホスト名>/」となります。これを、「http://<ホスト名>/test/」とするには以下とします。
「httpd.conf」に以下を追記します。(DocumentRootは「"/usr/local/apache2/htdocs"」のままとします)
RailsBaseURI /test
シンボリックリンクを作成します。
# ln -s /var/lib/redmine/public /usr/local/apache2/htdocs/test
以上の手順により、1サーバで複数のRedmineを構築することも可能です。
developmentモードで起動するには
「httpd.conf」に以下を追記します。
RailsEnv development
プラグインをインストールした後のDB初期化コマンド
rake db:migrate_plugins RAILS_ENV=production
参考
- 入門Redmine 第2版 Linux/Windows対応 / 前田 剛
- http://redmine.jp/tech_note/apache-passenger/ - Apache上でRuby on Railsアプリケーションを動かす/Passenger(mod_rails for Apache)の利用
更新履歴
- #RMagickをインストールする -- 2011年8月8日 (月) 21:41 (JST)
- #RedmineでMercurialリポジトリを参照する追加 -- 2011年3月20日 (日) 18:46 (JST)
- ページ作成 -- 2011年1月23日 (日) 16:35 (JST)
